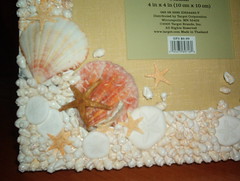
This shows the corner detail. I began by choosing the shells and star fish I thought I would use. I used many more than I anticipated! I laid out the larger scallops and added sand dollars around the frame. They were the larger of the pieces, so I needed to know where they would look best and how far over the edge I could go without looking intrusive.
In this first corner, the peachy scallop went down first and I topped it off with the dollars. Using the silicone as glue, I spread it thickly on the back of the ornaments and gently pressed them in place. I needed to be sure that the spaces under, beside, between and around the larger pieces were filled with the tiny shells before the larger ones were set permanently. To apply the tiny shells I used the silicone directly on the frame, spreading it about an eight of an inch, and hand placing each little shell one at a time. I would turn some with the smooth side down, others on their sides and gave as much variety as possible so that it looked as if they just fell on the frame and stuck. I used a paper clip (unfolded) to manipulate the tiny shells into spaces that were hard to fit; and made sure that the frame was completely covered.
I added star fish randomly, but with some composition. Also, with the star fish I needed to be extremely careful as they are most fragile. They dry stiff in whatever position they were laid out, so some are flat as pancakes, while others are convex and concave. Figuring out which would look best curved over this shell or that was pretty fun. I also made sure that if a star fish had a curved leg that it was supported by another object, thereby protecting it from future breakage.
I will allow it to dry for about 48 hours just because, in these matters, I tend to be paranoid! After that it will be filled with one of the many family photos we have taken while at the beach and hung in a place where I can see it everyday! Wahoo! (I really love that big blue!)


No comments:
Post a Comment