

 So last Saturday was the bake sale for
little Daylon. We were celebrating our grandson's birthday, so we were not able to attend a fund raising event down in Corona. It just breaks my heart seeing this little guy and, having a tiny percentage of an understanding of what his mother must feel, I wanted to do something, so I made cuppi cakes!
This top one is "Hazel's My Girl!" I love me some hazelnuts and Nutella, so it was a natural progression that someday they would wind up in a cup cake. Devil's Food cake, Nutella Mallow (first you take the mallow...) filling, then topped off with hazelnut infused butter cream swirled with chocolate, roll the whole shebang in fresh toasted -then crushed- hazelnuts, and "paint" the top with chocolate. Yup if you love those flavour combos then Hazel's your girl too!
Next up to bat is "Triple Lemon Heaven". Start with Lemon cake infused with real fresh squeezed lemon juice, add fresh grated zest. Top the cup cake with a puddle of lemon curd cream cheese, then top with a huge swirl of lemon juice infused butter cream and sprinkle with more zest. Heaven indeed!
Lastly is "My Crush". A peanut butter cake that scented the house and managed to even waft out to the drive way (driving my neighbor crazy!). Fill with fresh peanut butter cream cheese and top with sweet butter cream. Don't stop there! You're going want to add a crunch to the top by rolling the top in crushed butterfinger bars! Forget the calories, you'll do anything for your crush!

Rachel from LaFujiMama informs me that the run/walk and the bake sale brought in more than they expected, however only about 1/3 of what they anticipate needing if the insurance pulls through and covers the cost by 80%. You can see, that is a mighty big "if". So please please, if you can, go help Daylon! I think together our "if" can be huge! Let's do it!
Rachel has asked me to put up the recipes for the above cup cakes. Hmmm. These (well pretty much anytime I cook/bake) are a add this, toss that kind of thing, so how 'bout an agenda-recipe and ya'al can figure it out, k?
So here we go, ready?
Click on the following links to go to my new recipe section! Or just click on the recipe you want and go directly there!
S'mee Recipe Page
Hazel's My Girl
Triple Lemon Heaven
My Crush
enjoy!
Sunday, May 02, 2010
about Daylon, recipes the hard way, really long- but worth it?


Sunday, March 14, 2010
Ribs
 I never really liked ribs until a few years back, when after much coaxing from the boys and Thor I was persuaded to try. Before I made them myself, ribs were work! Lots. Of. Work.
The whole cooking process was a mess, then after you cooked them you have to fight to eat them. Even in a restaurant, they always were a struggle. I hated the fact that I had to tear the meat from the bone and then pick it out of my teeth like a barbarian. This was not my idea of relaxing family fare.
Then I ran into a terrific teacher who taught me his professional tricks. It got down to very little:
1. Buy the best ribs you can afford.
2. Trim off the membrane from the underside of the ribs (tough to do, but try to get as much as you can.)
3. Cook them low and slow.
Now beyond that folks decide whether they like dry or wet, hot or sweet, yada vs yada. Me? I use a dry rub, slightly spicy (read, barely this side of hot, but according to The Hygienist they are no where near hot). I place them on parchment, wrap them tightly and bake them 6 (yes SIX) hours at 250 without so much as a peek. They come out deep brown on the outside and fade to a sweet pink to light brown near the bone. I wait to bathe them in a sweet honey barbecue sauce until just before serving. I let it caramelize and then we act like the cave men we are and gobble them down.
The photos do not do them justice! However they do prove that those bones literally fall off clean. No pulling, no struggle, no meat in your teeth. Just perfectly tender juicy caveman fare! I pair them up with fresh cole slaw, slow cooked baked beans, and grilled fresh pineapple. Better grab the napkins!


Saturday, March 13, 2010
From the sublime to the rediculous

 Last post was on the fine art of making French Macarons. This post is on cheating.
I was contacted earlier this day and asked to make some cookies for a Fireside tomorrow night. I said I would however the day already had a pretty full agenda and also, making macarons takes a few days, so I just went to something easy and called it a night.
Peanut butter cookies with chocolate ganache drizzle. Easy.
You'd think. The thing is, no good deed goes unpunished. I had all the cookies baked and cooling and grabbed the ganache, put it in a squeeze bottle and went to town. I was doing pretty well. The chocolate was flowing! Then POP went the lid and about 3-4 tablespoons drowned about 4-5 cookies in a deluge of fudgy goo. Oh well, screw the lid back on and keep drizzling! Luckily I always make more than required, so there are plenty to make it to the party.
And well, those cookies drowned in ganache will just have to be eaten at home. sigh.
Wednesday, March 10, 2010
The French Macaron!
 So, as promised, I will now wax poetic about the French Macaron! Not the coconut haystack dipped in chocolate we are more familiar with here in the good ol' U.S. of A.; but rather the uber sweet, domed little sandwich cookie the French have perfected. (Please do not use the photo as the idea of perfection here. That's my macaron, kind of the plain Jane of all the cookies we made. Still as sweet and tasty, but with a cracked shell, she's just left to dance alone on the wall until all the other gals were taken. It's a shame, because WOW, ya wow, she can bust a move!)
The perfect macaron has just enough poof in her dome to make her attractive, a crisp shell, pretty "feet", and a chewy interior that lends itself to a flavoured filling. Made of at least 50% almond flour, French meringue, and some sugars, these little cookies are delicate to touch as well as to the taste. Helene Dujardin, of Tartlette was our (excellent and esteemed) teacher. (seriously...go to her blog SOON!) She has made every possible combination of flavours in her macarons, both in shells and in fillings...even a PB&J!
The class was attended by (little did I know) other famous and illustrious Foodie Bloggers. (I'm such a dork!) This is only about half of the gals there, and unfortunately I couldn't name them all here if I tried. For this I am truly sorry! Such a bummer to meet folks and then immediately forget names and blog names...I'm telling you, never get hit by a truck! (it's a long post, you may need to scroll, just know that taking a hit means you can't remember much.) My sis is there and next to her is La Fuji Mama aka, Rachel; who helped organize the class and get Helene to come all the way out to CA! (Thanks everyone!) You can see that everyone pretty much just laughed through the class! Helene was hilarious and fun! Oh ya, those pretty bags? They were filled will all kinds of baking goodies for us to take home, and some Fuji (coincidence?) water and pistachios in case we got hungry! So thoughtful ladies!


 The first thing we learned that, no matter which recipe you choose, make sure you measure precisely! Each ingredient was measured carefully and set aside prior to mixing so that when it was "go time" we didn't need to waste time!
 Freshly ground almond flour, confectioner's sugar, egg whites and a bit of white sugar...that's about it!


 The egg whites were beat until they were perfectly stiff and then then we began to mix everything together!

 Now, each of us was given a small container of powdered food colouring. Mine was blue, Robyn got "cherry red", and others in the class got those colours or green. Helene told us that about 1/2 tsp. of powder would suffice, except the blue, which was very potent! So heeding her advice I sprinkled my powder on top like it was salt. Hmmm.
 Robyn's batter came out a lovely pale ink, adorable and pretty! The gal next to me made hers a gorgeous berry, the gal next to Robyn: a perfect mint green for spring. All over the class there were amazing shades, perfect for holidays and celebrations and even a glorious "Avitar" blue (-which took everyone's breath away!) Mine? Well, I should have "salted" a bit more. In the batter my "blue" looked like pale pale green, after it was baked it took on a lovely and "appetizing" moldy gray tone. ick.


 All in all everyone's cookies came out "o.k.". But one of the most important things Helene taught us was that even with the experts, a perfect batch, all of your cookies coming out splendid, is rare. Almost every batch has a few goofy ones. (Good to know!) Also, she said "Confidence!" Confidence is what you need more than anything! If the cookies don't turn out this time, shrug it off, eat the "failures" (not too tough to accomplish!) and try try again! Each oven and each kitchen will alter a recipe, so keep trying until you find the perfect match! Stick to what recipe works for you and keep playing with different flavours to tempt your family! The ovens in our kitchen were partial to the top shelf, so only two bakers had "perfect" cookies, the rest of us had what I would say fantastic first efforts! Amazing taste, texture and the confidence to go home and make a batch all by our self! Now isn't that the goal of every good teacher? Thanks Helene! If you want to learn more about French Macarons, or good food in general, Helene is the go to gal, she is a food stylist, photographer and all around friend to whoever reads her blog. So go!
That's all for now, I need to set out my egg whites!
 Oh yes, that beautiful pastry box filled with delicate pink delights would be Robyn's! My only (quasi) good cookie is that lonely and dented one on the rack! Who cares? The rest of mine may have been misshaped, but Dang! they were yummy!
Wednesday, February 18, 2009
Gramma's Oatmeal


Many times I have tried to explain the difference between my Gramma's way of making oatmeal and what the world usually makes as oatmeal. For me, they couldn't be further apart!
Last week when I was with my Father in law he asked me to make them some "Coaches Oats". He explained to me how I would take one bite and be hooked because the texture of Coaches Oats was amazing. I have to agree, compared to most people's cooked oatmeal the Coaches Oats had a much better texture, a good bite, and a great oatmeal taste, however they still couldn't beat what I grew up on.
Gramma's way of cooking the regular Quaker Oats makes a great -firm but tender- (al dente) oatmeal that has absolutely no "oatmeal goo", which, sadly, the Coaches Oats still had a bit of.
I wish I could teach you her method on line, but it is a matter of feel rather than anything else. The feel of the amount of raw oats opposed to the water you cook them in, how and when to stir to avoid the goo, how long to let it cook. In three to five minutes you'll be amazed at the difference in taste, texture, and how much people want to eat it!
When the kids were little I would add chopped nuts, craisins, raisins, cinnamon, and we'd call it "Puppy Chow". Now my Grand-kids love to eat "Puppy Chow" when they are here for breakfast. Thor likes it with brown sugar and "oatmeal cookie" spices. For me, I could eat this as in the photo, as "Puppy Chow", or with a bit of white sugar and cold milk. Amazing taste and texture no matter how you choose "dress" it. Oh, and a piece of burnt toast for me! (Not sure why I love burnt toast with my oatmeal, but it's great!) One bowl and you can go well into lunch full of energy! Don't forget how good oatmeal is for your cholesterol!
So, if you are ever in the Mojave Desert on a cold rainy day, craving a steamy hot delicious bowl of oatmeal, with a tiny puddle of real butter and a spoonful or so of golden brown sugar, call me; I'll teach you how to make it the way Gramma did. You'll never cook it any other way!
Monday, December 22, 2008
an addendum...
You know it's interesting, this business of trying to be prepared for...whatever! This past week we here in the desert of southern California have experienced all kinds of weirdness. The thing that I brought away from it all is that I am uncomfortable. Wah. Someone call the Wambulance, S'mee is uncomfy. That said I know I am not as prepared for freak snow as I could be. Not enough insulating blankets, not enough warm sweaters, not enough housing closer to the equator.
People have been stuck in less than favourable circumstances: terminals across the country from where their transportation of choice cannot arrive or depart, or perhaps a friend' home because lack of utilities in entire states has been shut off -all because some snowflake got a power trip.
So as Thor and I spent the night apart (stupid snow!) I was glad that he had someplace to stay that was warm and welcoming. I was also glad that I knew how to take care of things here at home if that over night stay became more of a week a part. People in my neck of the woods are not prepared for snow like we experienced, no shovels, no city road equipment to appropriately clear roads (I could rant on that, but I won't), and the stores were depleted of things like Presto Fire Logs and ice scrapers; not to mention that if Thor couldn't get here, neither could the trucks that deliver little luxuries like food and fuel.
Time to think back on recent days and make a list that would help us if this happened again. hmmm, what would make my being stuck in an airport easier? (What could I actually pack in my carry on baggage? That's a tough one! Any ideas? Please share!) If I had to leave my home, or welcome others into it, what should I have on hand? Do I have anything that would help me stay home instead of evacuating when the power goes out?
Sometimes we can prepare and prepare and we still will get stuck. However, if we can grab a few things now that can make a difference later, why not do it?
If anyone has information or ideas, please share! Thanks!
Monday, December 08, 2008
Christmas Mice
Alrighty! Tis the season for all things sweet and loverly, and Christmas at S'mee's house just wouldn't go off right without a houseful of Christmas Mice. These super easy, super yummy cherry and chocolate treats are just the thing for getting you in good with the neighbors or, as in my case, my father in law...who can't get enough of them when he pops over Christmas Day.
Set aside about an hour and before you know it...you'll be in need of a people trap to keep certain folks from eating all your hard work before company can enjoy them!
Wednesday, November 05, 2008
Tuesday, November 04, 2008
Do One Thing: Project Noah: Week 10
Week 10: Coal, wood, briquettes, propane, matches, candles for cooking and light.
Hint: Make buddy burner. Cut strips of corrugated paper in 1 ½ in widths. Roll each strip tightly and fit in a tuna fish can. Pour melted paraffin wax in the can so that it soaks the paper and fills the remaining space. Each can will burn for 1 ½ to 2 hours!
Tuesday, October 28, 2008
cake. cake. and more cake!
 Oy! This month has been so unbelievably busy. Case in point: today.
Those would be my lovely digits covered in cake goo ala cake pops! Granted, our first try out was less than stellar, but the 70+ pops we made for a leadership meeting this week turned out cute enough!
After the pops were wrapped and readied to go, I headed home to bake a few cakes for the Trunk or Treat cake walk tonight. They are only a single layer, but I made a dozen of them! Yummy home made cakes with yummy add ins (like always!) and homemade buttercream frosting to make them look like mummies, Jack Skelington, and spider webs. Again, not as ornate as if I were charging for them, but tasty and fast and they'll make do for little monsters who will just be goblin' them down tomorrow anyway!


Do One Thing: Project Noah: Week 9
Week 9: 5 pounds legumes (beans & peas). (Probably wouldn't hurt to have a bottle of Beano in there as well...just sayin'.)
Hint: Have backyard camp out to practice emergency skills. (good opportunity to check out warm bedding).
Tuesday, October 21, 2008
This is Halloween...CupCakes!
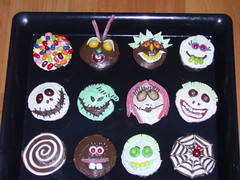
More Halloween goodies from the past. Nothing says fun like cool treats that aren't from the store. You can whip up a bunch of these for the kids you personally know and they will love gobblin' them up! This tutorial is a repeat from 2005, however they are pretty fun so here we go!
O.k. So this is the first run of cupcakes! I wasn't prepared for the decorations with special candies or frostings, but went ahead and came up with these little beauties with what we had on hand:
Dunked in Jelly Bellies, You're Bugging Me!, Spike, & Don't Forget to Floss.
Jack Skelington, Oogie Boogie, Sally, & Stock
High Anxiety, Buck, I only have eyes for you, & Miss Spider.
All cupcakes were chocolate with vanilla or chocolate frostings. I used Mega M&Ms, tiny M&Ms, Jelly Bellies, Life Savers, Sour Patch Strips, Green Apple Gum, Eclipse Gum, Jolly Rancher Rocks, and black Jimmies.
Frosting was applied via a zip lock bag snipped at one corner or with a butter knife. I also used a bamboo skewer to aid in the placement of many Jimmies! I am sure when I actually get out the cake gear and use the pro stuff they will come out even better. In the mean time, we're eatin' cupcakes for dessert tonight!
To view cupcake details more closely, click on the photo above. This will take you to my photo page at Flicker! Find the photo stream st the top right of the page and click the "next" photo, it should be titled: "I'm ready for my close up!" double click. It will come up full screen and with much better detail.
Wednesday, October 15, 2008
Oy...and a great soup recipe!
O.k. so lately I have been run-ing! Doing what? Who knows? But I feel like I run all day every day and get nothing accomplished.
The house is in disassemble and has been for about three weeks. We're painting. Two old people on ladders trying to paint cathedral ceilings = looooong time to paint a room. (and we are painting three rooms, plus the hall, and ceilings.) There are so many holidays (painter's term for missed spots) that we spend as much time going over a second layer as we did the first! My shoulders are reminding me they are still on my body; and forget my knees, they left me five or so years ago so when I worked in model homes. I don't ache at night any more than usual, however the strength just isn't there any more and I really feel it during the work.
Any who, the front room is in the dining room and the dining room is on top of the table, The table is shoved against the buffet, the family room is shoved as far into the fireplace as we dare shove it and there is a twelve foot ladder in my kitchen, which pretty much means my kitchen now is a twelve foot ladder. Seriously. No floor space left. I need to stand under the ladder to get to the sink or dish washer -and if I want to cook I just turn around while I am under the ladder and there you go, oven and stove...under a ladder. We move it a foot this way or that to open the fridge door or pantry.
I am ready for the painting to be done, however I think it's going to be at least another week before we get the painting done; we still have four inch base boards to repaint and put back into place (currently out on the porch) as well as the door frames. Curtain rods need to go back up (um, yeah, no naked walking around the house lately!) and switching furniture from the room it was formerly in to a different one and figuring out what to do with anything that no longer "fits".
All that after Thor gets home from work...usually about 7:30 each night and on Saturdays. Bummer.
I finally finished a shower curtain for The Hygienist, which took for-ev-er, she has been very sweet and not said a word, but seriously...forever. Cotton and silk (yes, I said silk, and yes, this is a shower curtain... but lest we forget, this is for The Hygienist, who at one time in her not so recent past dreamed of being a fashion designer and still has an "eye", if ya' know what I mean.) ahem, back to the curtain. An oversized (to accomodate the curved rod) piece with two rows of poof ruffling on top and (count 'em) twelve rows on the bottom, amazingly feminine and gorgeous. So her.
I've done a couple of tutes, one you have seen (the skeleton shirt), and one yet to publish, and hope to finish another soon.
I have projects hanging over my head that have been on hold for about two months (hang in there Kristy!) and then there is Christmas.
(Speaking of Christmas, I spent some time going through the library of links I have collected in hopes of compiling a sample of gifts to make for the upcoming season...pray for me.)
Prop 8 (obviously) has been on my mind as of late and I am back into politics as never before. The Scholar worked polling places during high school, The Hygienist has always been awesome in verbal and written communications, The FireFighter is seriously committed to community affairs; actually we all participated in politics to a point, especially Thor who is amazing; quiet unless you ask him and he feels like telling you his thoughts, but amazing. I need to admit that I really really hate politics, and yet, here I am, making enemies by the day it seems. I just feel like I can still voice an opinion on my personal blog and that should be hunky dory. I've lost bloggy friends and others now ignore me completely. It's just my opinion people, vote your own thoughts and heart.
Things in church have kept me hoppin' and it doesn't look as if the situation in that arena will change for a couple of months...so I keep going the best I can and doing my part.
And I made it grocery shopping for the first time in about four months yesterday. Fabulous. Forgot how much I like picking out a fresh veggie. I picked out some organic chickens and slow roasted them in anticipation of a rich stock to be used in a particular recipe later.
I found a recipe for a crazy good corn chowder (although I don't think the way it tastes it would be described as a corn chowder) - it turned out really flavourful and so delicious that I am wont to share it with you; so here goes:
I started by placing my washed and dried whole chickens, with their necks and gizzards etc. in my heavy enameled cast iron pot with a bit of butter, kosher salt, pepper corns, and crushed garlic -lots of garlic. I slow roasted those darling little chickens until they were tender, juicy juicy, and the joints easily tore from each other and the meat beginning to fall off the bone. From one chicken I took one full breast and thigh and chopped it into big bite sized chunks; and set it aside.
Ingredients:
1 chicken whole chicken breast -roasted and chopped into bite sized chunks
1 chicken thigh - roasted and chopped into bite sized chunks
4-5 pieces of meaty bacon, fried, diced
1/2 yellow onion - diced
1 small red pepper - diced
1 large jalapeno pepper - diced
1 russet potato - peeled and diced
2 cups fresh or frozen corn
2 cups sharp cheddar cheese - shredded
3 cups good stock
In another heated heavy pot I fried up four pieces of really meaty bacon. When the bacon was just about done I added the onion, red pepper, jalapeno, potato and corn. Saute the veggies with the bacon until they begin to caramelize, they don't all have to turn deep brown, but some should. Pull the bacon out and give it a good dice, return it to the pot and add the corn and stock. Bring to a low boil and simmer until the potato is fork tender.
Take about half of the soup, both veggies and stock and toss into a blender. Keep the lid on, but the cap out, cover with a small towel and pulse to puree the contents. Return this to the pot and fold into the soup.
Add the cheese, blend. Add the chicken, fold in and bring back up to a low simmer to reheat chicken. Taste to season with kosher salt and fresh black pepper. Serve.
Originally I was going to add heavy cream to the soup, however in the long run (read:standing under the ladder) I forgot to! It didn't matter, it was still so flavourful! And the best part? It was even more tasty the next day for lunch...really really good for lunch!
I wish I had a photo for you, but who cares? It was good. Try it.
(I'm dying for a huge ice cold Pepsi...like a craving, which I usually don't get with soda, but yeah, I'm going to grab one, somewhere. Who sells caffeine free regular Pepsi in a drive thru???)
Tuesday, September 30, 2008
Do One Thing: Project Noah, week 6
Week 6: 1 large jar of honey. (The larger the better..nothing better than a peanut butter and honey sammich when you need a sweet lunch! Just remember this treat is only for those over two years old. No honey for little ones!) Did you know honey has a really long shelf life, and that if your honey crystallizes it doesn't mean it's gone bad, it can be brought back to it's thick smooth sweet goodness via warming! (I want some toast with honey now.)
Hint: Double check flashlight and battery supply.
Also, for those of you who live in California: We, the entire state, have been invited to participate in the world's largest earthquake drill...ever! On November 13 at 10:01 a.m. we will "experience" a 7.8 earthquake along the San Andreas fault. This is only a drill! hehe! But hey, why not participate and see if you're as prepared as you think you are? Go to ShakeOut.org to sign up as a participant. It's free, and it's full of information on the drill. If you want other information on how to prepare for the actual event, the resources page has other videos, a webinar, and other website links to help you find information. Scroll the entire page, the good stuff is near the bottom. I personally viewed the webinar, and wow! there's some interesting stuff there.
Monday, September 22, 2008
When Life Gives You Lemons....
Buy Cookies! Robyn is whipping up batches of her famous Spritz cookies to help out with the Nie Nie fund raiser. She is selling them in TWO DOZEN batches, so you're getting a bargain and helping out! Click away and buy some cookies... I can endorse these with a full tummy- they're yummy!
Friday, September 19, 2008
That there is a clean rib bone!
 O.k. Here's the goods:
Before you start!!!
Calculate when you want to eat the ribs and go back 6.5 hours. If you want to serve at 5 those ribs have got to be in the oven with the door shut at 10:30. This is probably the most important step.
#1: Buy the absolute best ribs you can find. According to my mentor, they have more meat and meat is what you're after.
#2: Take them home, unwrap and set out on a good cutting board. Grab a sharp knife and make a good cut along the bone side of the ribs, this ain't easy, you're cutting into bone! Your goal: making a cut into the thin elastic funky whatever that is on the bones, the white membrane sheet of stuff. You're going to spend a bit of time picking and stretching as much of that membrane off as possible without jumping in the car and buying the ribs pre cooked elsewhere.
#3: Flip the rack over and go at the tendons and any other tough white material that may be on the meat side. Pliers work well for this, as does a nice sharp knife. You can grab a tube of the tendon-y stuff and pull tightly as your knife follows it and you scrap it from the rack. Don't get crazy, but get rid of as much of that stuff as possible.
#4. Wash the rack(s) under a good stream of water and pat dry. Set on a paper towel to catch drips.
#5: Dry Rub. This is my version, you can alter it if'n ya wanna.
2 Tbl. Kosher or Gray Salt
2 Tbl. White Sugar
4 Tbl. Brown Sugar
2 Tbl. Ground Cumin
1 Tbl. Chili Powder (more or less depending on who likes heat and who will be eatin'...)
1 Tbl. Fresh Ground Black Pepper
1 tsp. Ground Cayenne Pepper
3 Tbl. Sweet Paprika
1 Tbl. Garlic Powder (not garlic salt!)
1 tsp. Ground Onion Powder (or 2 tsp. dried onion flakes if you prefer)
1 tsp. Mustard Seed
Mix this all together.
I usually cut my rack into four or five rib per piece chunks, makes it easier for me, but hey, no rules here.
Take your dry rub and be generous as you coat the rack on all sides. Really get it into all the layers and creases on both the meat and bone sides. Set aside, I like to have them sit in this marinade for an hour or so, or...
If I am not having ribs soon, I will coat them with the rub and seal them in my vacuum sealer and put them in the freezer. This way when I pull the ribs out to thaw, they are marinating and I don't have too much to do the day of the cooking.
#6: Again remember to calculate when you want to eat the ribs and go back 6.5 hours. If you want to serve at 5 those ribs have got to be in the oven with the door shut at 10:30. Preheat your oven 20 minutes prior to placing the ribs in the oven at 250. Yes. 250. That's as high as you want them to bake. Tender meat = Low and Slow!
Knowing when you want the ribs served, grab a baking sheet. Cover the bottom with a piece of parchment across the sheet so the bottom is covered, and the parchment hangs over each side. (I get my parchment in bulk, full sheet cake sized, from Smart and Final - cheap!) Lay the rack(s) on the parchment, fold the remaining parchment over the top of the rack and cover the entire thing in foil, sealed. My baking rack is a half sheet pan, so I have to double fold my foil and then cover the sheet. I tuck the ends in over and curl them around the sheet sides to make a good tight seal. This will steam and bake the ribs and keep the moisture in the meat.
Put them in the oven and close the door. Don't even think about peeking until 4:30.
#7: At 4:00 grab 2 cups of barbecue sauce. I use K.C. Masterpiece Original. Add 2 cups of your favourite honey, I use orange blossom, whisk these two together until blended and set aside. That's 1/2 sauce to 1/2 honey.
#8: At 4:30 open the door and get the ribs out. Remove the foil and drain the juices. I think it's easier to just pick up the rack (mine are usually all in four to five bone servings) with tongs and roll them gently in the sauce; coating them well on all sides.
Your ribs will now be so tender they will fall from the bone so be careful how you pick them up and roll them in the sauce!
Place the rack back on the sheet and when all the racks are coated, back into the oven while I set the table and get the other food on. Or, if you want folks to think you have done these ribs on the grill out back, now is the time to do that. Fire up the barbecue and set the coated ribs there to caramelize until you serve. To me, this means one more thing to clean up later, but hey, it's your party.
By the time the table is set and folks begin to gather, your ribs will be caramelized and making everyone drool. Get them on a platter and sit down ready to hear the praise and compliments. I guarantee everyone will love them.
Fresh pineapple, cut into slices and dipped a bit in brown sugar, set under the broiler for a few minutes to caramelize is not only easy, but almost dessert!
I add a bit of fresh minced pineapple to a head of grated cabbage, a grated carrot or two and two green onions chopped through to the green and beyond, 1 tsp. of celery seed, 2 Tbl. white sugar, and a half cup of (I know -ick!) Miracle Whip. Fresh ground black pepper to taste. I blend all this, about an hour ahead, and chill in the fridge until serving.
Corn -bread or muffins, a hearty green salad, and a glass of milk will keep you from eating for two days afterwards. Enjoy!
Thursday, September 18, 2008
dem bones
 About five or so years ago I was shopping for ribs in Costco. I must have looked extremely intimidated as I shopped. I heard a smooth, deep, and slightly gravely voice slowly educate me. One of the largest men I have ever met stood behind me and asked,"You lookin' to cook up some ribs ma'am?" I turned (looked waaaay up) and replied a meager, confused and even discouraged "yeah." "Well, I don' mean no disrespec ma'am, but- you look in the mirror lately? You white! And ain't never been a white girl who kin make a good rib witout some hep. Lemme hep you out." (Grinning like a Cheshire cat at my silliness and holding back his giggles) "You see dem bones you lookin' at? They baaaad. You don' want dem missy, you want dese... ova here." I walk with him over to the expensive ribs. "You see ma'am, I use da be the head cook at a little rib joint down in Sanna Mon-ca."
At that point in the conversation my memory (and stomach) took an immediate turn to a hole in the wall on Santa Monica Boulevard where they made the best ribs in the world, or at least my world. They were amazingly moist, tender- so much so they did fall off the bone, and flavourful. The perfect combination of spice to sweet, and meaty enough to satisfy.
"You wouldn't mean 'Dem Bones' would you?" "Oh, you heard o' my little place? Yeeees ma'am. But those days is pass now. Now I find myself educatin' the likes of you folks, hehehe." "Well, please! I don't have a clue of how to start." So he clued me into a few of his tricks and from then on I have loved my version of his "dem bones" style ribs.
Last night we were scheduled to serve the missionaries dinner, so I thought a good end of summer treat would be a rack or two of ribs, fresh cole slaw and grilled pineapple. The two guys called to cancel at the last minute and so Thor and I sat down to a feast!
As you can tell from the photo, the ribs were juicy, tender enough for the bone to just sliiiide off perfectly clean and so goooooood! yum!
All because an extremely nice gentleman showed me his famous barbecue tricks! Thank you Dem Bones Man!
Tuesday, September 02, 2008
Project Noah: week three! Milk Products
Week 3: 1 large box or ten envelopes of instant milk.
A friend of mine suggests adding a box or two of your favourite milk flavouring, like Ovaltine, because most folks aren't super fond of powdered milk. Adding chocolate to it will make it more palatable!
Also, remember that milk isn't just for drinking but also for cooking.
Plus, if you have or think you will have someone in need of formula or soy milk, better add those as well.
Tuesday, August 19, 2008
Do One Thing! 3 web sites and a new weekly program!
We have our 72 hour kit and our first aid kits so what do we do now?
Food storage is such a huge elephant we often feel over whelmed!
If your state or local government allows you to store food -you should! There are plenty of places to store it, even in an apartment, as long as you get creative.
We should begin storing at least one week of extra food, just in case. Imagine your job being suspended or gone completely. Wouldn't it be nice to not have to depend on running to the store for a week? Perhaps you have unexpected guest drop by for a few days, or your college kids need a quick CarePackage. There are many reasons why having an extra week of food readily available, natural disasters are just the ones most people think of first.
We need to begin eating our food storage elephant! The best way to get started is to just go slowly, one bite at a time. This post has a couple of ways to help you out with the task. The first is a food storage recipe website, another website for tracking what you store, and the third a weekly program to help us build a year's supply for two people for under $10.00 a week.
Next time you are making out your shopping list add one extra meal to the list. If that bursts the budget add as much of that meal as you can, even one extra can is more than nothing! If your budget can handle it, add more than one meal! Or you can shop by product, say, week one I'll buy fruit, week two- veggies, three -meat, and so on.
Most food storage sites will recommend that you store basics in bulk such as wheat, flour, sugar, salt, and oil. These are staples that will get you through most incidents. However, you also need to know how to cook with those items as well. So as you begin to store your staples, begin to use them so that you have recipes your family will eat. A resource for recipes is: Every Day Food Storage, she's amazing! Crystal uses her basics everyday to rotate her food storage and has become very popular with her recipes, which she shares!
If you want to begin with just the regular meal plans you normally use, that is great also. You'll be storing what you already eat.
Check the papers for sales or coupons that will give you two for one. Are there any bulk sales this week? This is the time to grab onto whatever bargains you can! Let's say they are having a case lots sale on vegetables and you have enough set aside to purchase two cases. Purchase a case of this, and a case of that, and bring it home. It may not feel like it, but you're on your way. Next time you'll purchase a different item that your family regularly eats and before you know it, you will have stored an extra weeks worth of food.
A few weeks back they had a huge sale on Raisin Bran, which Thor could easily eat for days on end. I picked up all my budget could handle and got it stored in my air tight sealed buckets. The cereal should last for about three months easy! When the container in my cupboard gets low, I'll just go to the bucket and fill it up, rotating out my stock.
There are many sources to help you out in finding what to purchase and what to store. The best advice is to store what you already eat. A great website for keeping track of what you have is : Track My Food Storage. This is a free service that allows you to add personal data into documents so that you can see what you are storing.
Track My Food Storage also has an alternative plan which does cost a subscription, but the free plan is a great start. They will ask you for some vague personal info, which is secure, but I am sure you could also put in false identity if you choose and no one would be the wiser. There is an option to link up to websites that offer food storage shopping on line, but again, you never need to shop, you can calculate your own purchases.
The charts allow you to calculate what you purchase, when, what the expiration dates are, costs, storage location and also a place for notes on each item. The fee based subscription will notify you when supplies are getting low or close to code dates, rotation help, etc.
One last site that I think is fabulous, and one that we used in our ward* was Project Noah. Unfortunately I can no longer access the link. The good news is however, that I have the list they provided and we can start with that!
So here were are again, a week by week project that will give us everything we need to build our food storage without breaking the bank.
Week 1: At least 7 gallons of water.
Hint: Water storage may be in plastic bottles, to which bleach may be added if the purity of the water is in question. (generally l/2 tsp per five gallons if water is clear or 1. tsp. per five gallons if water is cloudy.) In case of emergency, the water in water beds, water heaters, toilet tanks, and cisterns may be purified and used. It is generally accepted that water is best stored in thick plastic barrels which are placed on a surface other than concrete/cement. If you need to store any plastic on a concrete/cement surface place a barrier between the container and the concrete.
Milk jugs are not a good storage container as they are designed to break down quickly, two liter soda jugs are "o.k." but also not recommended.
*ward = congregation
Wednesday, August 06, 2008
cupcakes galore!


On top of everything else yesterday I made about 140 some cupcakes. On Sunday, our Relief Society President asked us if we would help her with a non church service project. She is a RN and one of her patients was diagnosed with cancer. He has a small family and a large ranch and works as a fireman. She contacted his station and explained his condition and arranged for all the guys at the station to come and help him out by doing some chores on the ranch.
In exchange for their service she said she would provide them with food and drink. That's where we come in. She asked us if we would chip in and provide salads and desserts.
I volunteered for 70 cupcakes. My cupcake papers are a bit, not much, but a bit smaller than a normal cupcake liner, so I decided to make three different varieties for the guys to choose from.
The first is my "Funky Chunky Monkey Lovin'" a banana infused yellow cake with chunks of real banana, banana pudding, a touch of nutmeg, and topped with chewy - crunchy caramel and crushed nilla wafers. You only need one of these seriously sweet babies!
Second is "Lemon Heaven", a lemon pudding cake topped with a sweet lemon infused buttercream cloud. Refreshing and yummy.
Third is "Uber Chocolate" the super moist dark chocolate cake, a bit of chocolate pudding and topped with a generous swirl of sweet buttercream. So moist I guarantee you will have cake stuck to your fingers!
I think all three of these are best served a bit cold, but hey, take 'em anyway you can get 'em!
The last is a fridge shot of one of the sheets chilling. Thor was sad to see them go, but I left him one of each to eat during the week.
Update: I heard from the organizer today that the cupcakes were a hit with the fire fighters! Yeah!



 Posts