Is anyone even still checking in? I'm not sure. But if you do, thanks. I am sorry I have been such a slacker lately. I'm o.k., but I just can't seem to find the blog motivation. That said I have been crafty lately...gearing up for the holidays.
I love Halloween. See the Halloween posts in the archives to find other things I have thrown together in the past. This year a few different items. I hope to have a You Tube "how to" up soon. In the mean time here are a few of the items I have been working on:
Chair Scarves. I used a window scarf I bought 3 years ago, cut into 4 parts, hemmed it and then threw it over the chairs and tied it off with a ribbon. Free and easy recycle!
I went to the fabric store and found $2 and $3 per yard fabrics on clearance and essentially just cut the one twice, hemmed all raw edges and threw it on the table to make a base cloth that would go all the way -and then some- to the floor. I had the gal at the store cut the top fabric to a square; however wide it was, that would determine the scale of the square, so be it. Hemmed and thrown on the table. Not Free, but almost, and totally easy. Plus both clothes can be used for other occasions, dressed and accessorized with other colours or item and that will decide the mood later!
An old recycled wreath, this one black, topped with 99c Store (really bad) black roses, tipped with a bit of green glitter and red roses spray painted with flat black. (In the photo the original red really shows through, in real life the red is more of a suggestion than a visible colour.) I just snipped the roses from the bunches (4 black, three red) and used the wire in the wreath to secure them in place. I added left over ribbon in a bow and there you have it. Recycle + $7.00
This is the one I am most excited about. I was sharing a snack at a friend's home when she served her goodies on the most gorgeous plates. White background with black printed toile "solid" plates and also as an edge. I adored them! Too expensive after the inquiry of where and how much? What to do? Head down to Dollar Tree and find some flat edged plates! At $1 a piece this would be a great alternative. I used a permanent on any surface ink and some scroll designed rubber stamps, and badabing badaboom I have my black and white plates. Not toile, no solids, but with the same feel! I think they'll look really awesome on the Halloween table, but also later and not so spooky! $8.00 for a whole new set of dishes!
Well that's it. See you soon, I hope!
Click on the photos to get a closer look!
Thursday, October 08, 2009
Hi Blogger, it me, S'mee....

Wednesday, February 18, 2009
Gramma's Oatmeal


Many times I have tried to explain the difference between my Gramma's way of making oatmeal and what the world usually makes as oatmeal. For me, they couldn't be further apart!
Last week when I was with my Father in law he asked me to make them some "Coaches Oats". He explained to me how I would take one bite and be hooked because the texture of Coaches Oats was amazing. I have to agree, compared to most people's cooked oatmeal the Coaches Oats had a much better texture, a good bite, and a great oatmeal taste, however they still couldn't beat what I grew up on.
Gramma's way of cooking the regular Quaker Oats makes a great -firm but tender- (al dente) oatmeal that has absolutely no "oatmeal goo", which, sadly, the Coaches Oats still had a bit of.
I wish I could teach you her method on line, but it is a matter of feel rather than anything else. The feel of the amount of raw oats opposed to the water you cook them in, how and when to stir to avoid the goo, how long to let it cook. In three to five minutes you'll be amazed at the difference in taste, texture, and how much people want to eat it!
When the kids were little I would add chopped nuts, craisins, raisins, cinnamon, and we'd call it "Puppy Chow". Now my Grand-kids love to eat "Puppy Chow" when they are here for breakfast. Thor likes it with brown sugar and "oatmeal cookie" spices. For me, I could eat this as in the photo, as "Puppy Chow", or with a bit of white sugar and cold milk. Amazing taste and texture no matter how you choose "dress" it. Oh, and a piece of burnt toast for me! (Not sure why I love burnt toast with my oatmeal, but it's great!) One bowl and you can go well into lunch full of energy! Don't forget how good oatmeal is for your cholesterol!
So, if you are ever in the Mojave Desert on a cold rainy day, craving a steamy hot delicious bowl of oatmeal, with a tiny puddle of real butter and a spoonful or so of golden brown sugar, call me; I'll teach you how to make it the way Gramma did. You'll never cook it any other way!
Do One Thing! -Project Noah 21
Week 21: 1 lb. Dried fruit & beef jerky (apples, pineapple, apricots, bananas etc.) for 72 hour kit.
Tuesday, February 17, 2009
liquid-gel laundry soap tutorial
There are several DIY Laundry Soap recipes out there, I chose this one because my friend uses it on a daily basis and swears by it. She has four small children and a busy hubby. I figure if it is good enough for her, then it is good enough for me!
At 320 full loads per batch (TEN GALLONS!) this is well worth the cost (about $5.00!) and the hassle. The worst part is grating the bar of soap, which is just a tad more difficult than grating cheese. (just a tad, really, because it's soap and you can't nibble while you work.) You can always do what I did and enlist the help of someone big and burly. Tally up the time involved and it will be about an hour - tops.
Also, I need to warn you that this soap starts out as a liquid, then turns into a gel as it sits. Like Jello, seriously. You will need to stir it, shake it, or whatever you want to get it to liquefy again. Once it is a liquid again it is Sliiiiiii-mey! Like dinosaur goo, kind of creepy. Then again, I never went elbow deep into any of my other laundry soaps, so maybe they were slimy also? Oh well, you only have to do the elbow deep thing once, if you want, or you can find a long study stirring stick and avoid the slime altogether, I just went in! I digress. When it sits, it gels, so each time you use it, give the bottle a good shake. Easy enough.
NO DYES. NO PERFUMES. (unless you want to add 5-10 drops of your favourite essential oil) Safe for septic systems. Safe to use in front load and high efficiency washers. I think it works great. The clothes come out of the dryer with out a scent per sey, but smelling fresh, and feeling good to the touch. To me, I think this soap rinses out more efficiently than my other brands of soap did, hence the good feel to the fabric. This is basic stuff here folks, not quite Little House on the Prairie, but basic good soap.
The way I look at it is, if you have to save money, if you have to cut back and scrimp, wouldn't laundry soap be the place to start? I mean, better than say, eliminating those cute shoes you saw last week? Yeah, I thought so too.
Friday, February 13, 2009
Healing, Helping, Heat, and Hand Made Give Away!
 I am headed down to help my mother in law for the day (or two?). In my absence I am sending everyone some warmth and encouragement for springtime weather! C'mon Mother Nature, bring it on! We need some heat!
Now the Give Away!
There is a great idea floating about lately and here's the drill:
I promise to send the first 3 persons who comment in this post something hand made before the end of this year. (Thank you to whoever came up with that rule!) Yup, something fabulous from little 'ol S'mee! Maybe photo cards, maybe a painting, maybe something hand sewn, or who knows? But definitely hand made! And received before the end of this year. Oh the mystery! What will it be? (if only the neighbors dogs could be considered "home made"...you'd receive your gift, like, on Monday! But alas, no. so you'll need to wait and be surprised!)
Here's the rub: If you sign up to receive a hand made gift you need to "pay it forward" on your own blog. That is, you'll make a post similar to this and then promise and hand make a gift for three other bloggers by the end of the year! C'mon, an-y-thing home made by you by the end of the year! You can do this! How fun!
So o.k. my peeps! Comment away!
Sunday, January 25, 2009
This little light of mine

A project I have been working on involves oil lamps. I have looked everywhere to find inexpensive versions of biblical types of clay lamps, they're out there, just not cheap enough for what I need in the project (read: over 150 lamps).
In my search I found out information on oil lamps of old. Anciently all it took was a small lump of clay, rolled into a ball and then flattened, pinch up one side and curl up enough of the other side to make a well and there you go. Because olive oil has such a high flame point, a puddle of (olive) oil will rarely burst into or sustain a flame, but dip 100 percent cotton cloth, or wick into the oil and light it and poof, a flame. One could make a lamp that would give enough light to walk by, read with, or make their way through dark streets or rooms with a simple little lamp.
The more clay the better design of the lamp. Make a larger well (like the one in the photo) or even throw a pot onto the wheel and design a symmetrical, almost perfect, bowl for the oil. Adding a spout and a handle and you were living large. Typically the oil reservoir was filled via a opening in the top center of the well, making it more stable and less likely to spill.
Since the oil would not burst into flame on its' own, the length of the flame was determined by the length of the wicking material. Draw out more or less and the flame takes its' direction. The vessel stays cool to the touch, only near the flame does it warm.
So with my newly acquired knowledge I decided to see what I could make. The small, a little smaller than three inches long lamp above, took an extremely small amount of clay and five minutes to produce. After curing, I took a length of pure cotton, cut it about a half inch wide and four inches long, twisted it and threaded it through the hole. I poured in about three tablespoons of oil and let the cotton wick soak it up for a minute or two then lit the end. It was a great little light! I was surprised at how bright the flame was and how much light that tiny vessel put out.
Plans are now for me to see if I can grab a pound of clay and make a few more and set them aside for those times when the lights really go out! Let's hear it for ancient technology!
Thursday, January 01, 2009
Do One Thing! - reminder
Hey folks, it's New Year's Day - a great time to rotate items in your 72 hour kits and storage.
Dump the stored water on your plants, inside and outside, and refill your containers with fresh water.
Go through stored clothing for people who have changed their size over the past year or grown, add the correct sizes and repack the kits. Don't forget shoes, and outer wear as well.
Check prescription dates on stored meds in your first aid kits and rotate with fresh items.
Lastly just do a quick check on your supplies to look for trouble spots, water damage, loose wrappers, whatever. Tidy everything up and feel good about all your hard work this year on being prepared! See you Tuesday with a new item!
Wednesday, December 31, 2008
Happy New Year!
I've never been much for the whole New Year's resolution tradition, too much public risk and disappointment, which is weird because basically I am a pretty open book, but there you go. I guess it's kind of like breaking a promise to myself or something... don't wanna do that!
However. Things and circumstance always change and change is always good. So in light of the newfangled year and all it brings, here's a bit of a 'to do' list if you will:
Remove the furnishings, carpeting and all, from the "girls" room. Then do the same with the "studio" (heretofore the "boys" room).
Put down commercial grade Berber in both rooms, add new floor moldings.
In the new "guest room" add: a queen sized bed, the "family" dresser, and hang some photos. All this to make access to the bathroom easier and more convenient for guests, and to make a nice place for little people to play and nap closer to mom, dad, and or grandparents.
In the studio: Paint the closet doors chocolate brown. Configure the best way to align solid shelving along one wall, leave enough space for the gynormo (yet fabulous) business desk (soon to be an artist's desk!). Rehang the paper stack and glass shelves and generally make the room back in to a studio.
Put the food storage in the guest closet - finally.
Hang blinds in the front room.
Make a cornice box for the front room window.
Add bark cloth faux drapes to the inside of the cornice box.
Find and purchase a 5x7 rug for the front room.
Hang stuff (to be determined later) on the front room walls.
Rehang the wall arrangement in the hallway.
Repaint the master bedroom.
Repaint the two dressers and two side chests in the master bedroom and add grass cloth inserts, decide if I need/want a headboard of same after seeing the finished furniture.
Paint. Paint on canvas. One painting (at least) per month.
Clear out the "shed" and reorganize the boxes out there. Learn E-Bay and/or garage sale the items and begin to de-clutter on a huge scale.
Use up the crafting materials I have on hand.
Make specific items for sale in two major city open air markets, summer, fall, and winter. Meaning I will have a schedule for assembly line type of crafting to build up product.
Learn loom knitting, which seems pretty easy from what I can tell so far.
Take at least ten photos per day in an effort to become a better photographer.
With Thor, empty out the garage of clutter and sell off what we haven't used in years. Organize it so that more space can be used for the gym equipment we already have.
As far as personal goals are concerned, they will remain personal. However some old habits will be renewed and some forgotten. Continue to work on self reliance and emergency preparedness, adding to and rotating what we already have.
I'll let you know how well the other goals come along and hopefully post some photos as the projects progress.
So Happy New Year everyone! I hope all your goals and resolutions are fun and fulfilled!
Tuesday, December 02, 2008
Do One Thing: Week 14
Week 14: Bandages.
Hint: Make sure you have emergency provisions for pets.
Standard First Aid Supplies: adhesive tape, ammonia, antibiotic ointment, bicarbonate of soda, calamine lotion, diarrhea remedy, elastic bandages, gauze bandages, hot water bottle, hydrogen peroxide, ipecac syrup (induces vomiting), knife, matches, measuring cup, medicine dropper, needles, paper bags, razor blades, rubbing alcohol, safety pins, scissors, soap, thermometer, triangular bandages, tweezers, first aid book, prescription medications, consecrated oil. First aid kits and supplies should be checked and replenished regularly. All supplies should be labeled and organized for fast use.
Tuesday, November 25, 2008
Do One Thing: Week 13
Week 13: 1 gallon bleach.
Hint: Learn how to "Protect your Home against Fire".
UPDATE:
First, I got a head's up from Willis, about Costco's 6 day kit for Two People being on sale! Check it out: According to the ad:
Basic preparation will impact the probability of your family’s survival in an emergency. Survival Kit designed for 2 People for a total of 6 Days in 1 bucket. Keep at home and in your vehicle. This kit contains the food and supplies you need for 2 people for 6 days in 1 bucket. In the event of an emergency – keep your family well fed and warm. Keep one in a convenient location at home and one in the trunk of your car. Food is 100% Vegetarian with a 20 Year Shelf life.
click here---->6 Day Kit for Two People $20.99 OFF! Now: $49.00!Second: I guess I dropped the ball on the above suggestion. Sorry no links! Ack!
I was thinking that by suggesting it, one could search their home owners policies to see how up to date they are, what is covered and then do any adjustments. Most insurance companies will cover your hotel expenses for three weeks, after that, you're on your own. Are you prepared for what else may not be covered? Most home repairs/rebuilds will take much longer than three weeks, even FEMA will not house you for much longer than your insurance company. You will need an alternate plan. Clothing allowances are usually $100.00. Most families will find that is not enough to "cover" them! Again, making a plan ahead of time will ease stress when stress is a daily situation. Recovering household items may mean reassessing their values at retail value as opposed to replacement costs, which are much higher. Your fridge may be 8 years old, it's value would be much lower than that of a new appliance. Also, many insurance companies will want receipts for everything you purchased and want replaced. I'm not sure about you, but I don't have receipts for everything I buy.
Getting all your important information recorded onto flash drives or c.d.s. (Think of everything you would need to start over, insurance, birth certs, school records, medical records/info, SSI numbers, etc.) Do the same with family histories and photos. Make sure someone who does not live in your home can access the information if they need to for you.
Have plans in place ahead of time in regard to what to do when or if you need to evacuate. Do you have a plan to evacuate if you are not at home or can't get home at the time of the evacuation? (Have you set up a neighbor or nearby friend to help you out if you are unavailable and do they know what to grab for you?)
Do your children and or aged adults (or anyone else living with you) know the routine, the plan and escape routes and where to meet if there is an emergency? Have you shown small children how to escape via their bedroom window, and how to decide whether or not to do that? Do they have ladders or stools to give them access? Do they know they safest way to break a window if necessary? If your home is multi-story do you have window escape ladders in all the rooms? Have your little kids been introduced to FireFighters and the equipment they use (masks, air tanks, uniforms, etc.) so they will not be frightened by their rescuers appearance and sounds? Do they know what your alarms sound like and what they mean and what to do when they hear them?
Are your pets in the plan? FireFighters will not risk their life to save an animal, however they will go in after a pet if at all possible. Stickers on windows will let them know if pets are expected to be in or out of the house.
Are your smoke detectors/alarms fresh? When is the last time you tested them? Do you have freshly charged fire extinguishers?
Outdoors, at least in our area, that 30 feet of defensible space, weed abatement, house and garage clean of oil or rags, yada yada.
Is the roof fire safe or extremely flammable? Are the gutters clean of debris that could catch flame? (This is how many of the houses in the recent fires caught fire, via flying embers!)
yeah, stuff like that. I hope that gets your ideas working and thinking on how you can determine how fire safe your house is.
Tuesday, November 18, 2008
Do One Thing: Week 12
Week 12: 2 bars of body soap per person. (probably wouldn't hurt to have some body lotion too.)
Hint: If you have a fireplace double-check to make sure flue is clear and the fireplace is clean and can be used without danger.
Thursday, November 13, 2008
Are you ready to Rumble?
Don't forget! Today is the big day for the Great California Shake Out! The Drill! Today at 10:15 a.m. we'll be rockin' and rollin' in a drill made to feel like a 7.8 earthquake! Don't forget to register and head over for all the great details!
Practice makes perfect!
Monday, November 10, 2008
Do One Thing: Project Noah: Week 11
Week 11: Dish Soap.
Hint: Store extra prescription medication in an air tight container labeled "Emergency use only." Rotate it each time you renew your prescription.
Wednesday, November 05, 2008
Tuesday, November 04, 2008
Do One Thing: Project Noah: Week 10
Week 10: Coal, wood, briquettes, propane, matches, candles for cooking and light.
Hint: Make buddy burner. Cut strips of corrugated paper in 1 ½ in widths. Roll each strip tightly and fit in a tuna fish can. Pour melted paraffin wax in the can so that it soaks the paper and fills the remaining space. Each can will burn for 1 ½ to 2 hours!
Tuesday, October 28, 2008
cake. cake. and more cake!
 Oy! This month has been so unbelievably busy. Case in point: today.
Those would be my lovely digits covered in cake goo ala cake pops! Granted, our first try out was less than stellar, but the 70+ pops we made for a leadership meeting this week turned out cute enough!
After the pops were wrapped and readied to go, I headed home to bake a few cakes for the Trunk or Treat cake walk tonight. They are only a single layer, but I made a dozen of them! Yummy home made cakes with yummy add ins (like always!) and homemade buttercream frosting to make them look like mummies, Jack Skelington, and spider webs. Again, not as ornate as if I were charging for them, but tasty and fast and they'll make do for little monsters who will just be goblin' them down tomorrow anyway!


Do One Thing: Project Noah: Week 9
Week 9: 5 pounds legumes (beans & peas). (Probably wouldn't hurt to have a bottle of Beano in there as well...just sayin'.)
Hint: Have backyard camp out to practice emergency skills. (good opportunity to check out warm bedding).
Tuesday, October 21, 2008
This is Halloween...CupCakes!
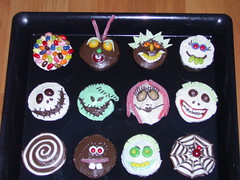
More Halloween goodies from the past. Nothing says fun like cool treats that aren't from the store. You can whip up a bunch of these for the kids you personally know and they will love gobblin' them up! This tutorial is a repeat from 2005, however they are pretty fun so here we go!
O.k. So this is the first run of cupcakes! I wasn't prepared for the decorations with special candies or frostings, but went ahead and came up with these little beauties with what we had on hand:
Dunked in Jelly Bellies, You're Bugging Me!, Spike, & Don't Forget to Floss.
Jack Skelington, Oogie Boogie, Sally, & Stock
High Anxiety, Buck, I only have eyes for you, & Miss Spider.
All cupcakes were chocolate with vanilla or chocolate frostings. I used Mega M&Ms, tiny M&Ms, Jelly Bellies, Life Savers, Sour Patch Strips, Green Apple Gum, Eclipse Gum, Jolly Rancher Rocks, and black Jimmies.
Frosting was applied via a zip lock bag snipped at one corner or with a butter knife. I also used a bamboo skewer to aid in the placement of many Jimmies! I am sure when I actually get out the cake gear and use the pro stuff they will come out even better. In the mean time, we're eatin' cupcakes for dessert tonight!
To view cupcake details more closely, click on the photo above. This will take you to my photo page at Flicker! Find the photo stream st the top right of the page and click the "next" photo, it should be titled: "I'm ready for my close up!" double click. It will come up full screen and with much better detail.
Do One Thing: Project Noah, week 8
Week 8: One bottle of vegetable oil or one can of shortening.
Hint: Double check emergency supplies for baby, are diapers and clothing going to fit? (We used to buy sweat shirts/pants one year's size ahead and then just switch it out on the 'anniversary'.) Formula? (even nursing moms should make sure there is formula available and enough water stored to mix it properly.) Also, if you have a special needs dietary condition in your family, store their special diet foods as well; or whatever your doctor advises as an emergency substitute. This is the time to ask and prepare!
Friday, October 17, 2008
Help!


O.k. Crafters, I need your help! This is a work in progress and I am stumped and second guessing myself. I need someone to tell me either "STOP!" or "KEEP GOING!"
Imagine "Evil Queen". This is her crown. The top photo shows the addition of beads and I thought to plan even more beading. The bottom photo is just stopping where it's at and letting the lace do the story telling.
So please advise! Is it a matter of "less is more" or "more is more"?
Comment!