Showing posts with label saving money. Show all posts
Showing posts with label saving money. Show all posts
Tuesday, February 17, 2009
liquid-gel laundry soap tutorial
There are several DIY Laundry Soap recipes out there, I chose this one because my friend uses it on a daily basis and swears by it. She has four small children and a busy hubby. I figure if it is good enough for her, then it is good enough for me!
At 320 full loads per batch (TEN GALLONS!) this is well worth the cost (about $5.00!) and the hassle. The worst part is grating the bar of soap, which is just a tad more difficult than grating cheese. (just a tad, really, because it's soap and you can't nibble while you work.) You can always do what I did and enlist the help of someone big and burly. Tally up the time involved and it will be about an hour - tops.
Also, I need to warn you that this soap starts out as a liquid, then turns into a gel as it sits. Like Jello, seriously. You will need to stir it, shake it, or whatever you want to get it to liquefy again. Once it is a liquid again it is Sliiiiiii-mey! Like dinosaur goo, kind of creepy. Then again, I never went elbow deep into any of my other laundry soaps, so maybe they were slimy also? Oh well, you only have to do the elbow deep thing once, if you want, or you can find a long study stirring stick and avoid the slime altogether, I just went in! I digress. When it sits, it gels, so each time you use it, give the bottle a good shake. Easy enough.
NO DYES. NO PERFUMES. (unless you want to add 5-10 drops of your favourite essential oil) Safe for septic systems. Safe to use in front load and high efficiency washers. I think it works great. The clothes come out of the dryer with out a scent per sey, but smelling fresh, and feeling good to the touch. To me, I think this soap rinses out more efficiently than my other brands of soap did, hence the good feel to the fabric. This is basic stuff here folks, not quite Little House on the Prairie, but basic good soap.
The way I look at it is, if you have to save money, if you have to cut back and scrimp, wouldn't laundry soap be the place to start? I mean, better than say, eliminating those cute shoes you saw last week? Yeah, I thought so too.

Sunday, January 25, 2009
This little light of mine

A project I have been working on involves oil lamps. I have looked everywhere to find inexpensive versions of biblical types of clay lamps, they're out there, just not cheap enough for what I need in the project (read: over 150 lamps).
In my search I found out information on oil lamps of old. Anciently all it took was a small lump of clay, rolled into a ball and then flattened, pinch up one side and curl up enough of the other side to make a well and there you go. Because olive oil has such a high flame point, a puddle of (olive) oil will rarely burst into or sustain a flame, but dip 100 percent cotton cloth, or wick into the oil and light it and poof, a flame. One could make a lamp that would give enough light to walk by, read with, or make their way through dark streets or rooms with a simple little lamp.
The more clay the better design of the lamp. Make a larger well (like the one in the photo) or even throw a pot onto the wheel and design a symmetrical, almost perfect, bowl for the oil. Adding a spout and a handle and you were living large. Typically the oil reservoir was filled via a opening in the top center of the well, making it more stable and less likely to spill.
Since the oil would not burst into flame on its' own, the length of the flame was determined by the length of the wicking material. Draw out more or less and the flame takes its' direction. The vessel stays cool to the touch, only near the flame does it warm.
So with my newly acquired knowledge I decided to see what I could make. The small, a little smaller than three inches long lamp above, took an extremely small amount of clay and five minutes to produce. After curing, I took a length of pure cotton, cut it about a half inch wide and four inches long, twisted it and threaded it through the hole. I poured in about three tablespoons of oil and let the cotton wick soak it up for a minute or two then lit the end. It was a great little light! I was surprised at how bright the flame was and how much light that tiny vessel put out.
Plans are now for me to see if I can grab a pound of clay and make a few more and set them aside for those times when the lights really go out! Let's hear it for ancient technology!
Friday, January 09, 2009
Now I'm just really hungry for a cookie.
If you make a new year's goal you're going to have to make some changes.
Those changes will make you sit down with a newspaper and circle certain sale items with a pen.
If you circle items on sale then you'll have to adjust your budget to accommodate the purchasing dates and quantity limits.
If you actually go to the store and purchase the limited quantities and other sale items you're going to have to keep them in the freezer.
If you need to keep stuff in the freezer you're going to have to clean and reorganize the freezer to make room for all the new items.
If you organize the freezer you'll find out that you'll need to get out the food sealer and repackage all the newly purchased food into meal size portions.
If you package the portions you'll need to get out the black magic marker and write the dates on the packages.
As long as you have all the dated portions in the freezer you may as well make menus.
If you're going to make menus, you're going to need a pen...
Tuesday, January 06, 2009
Do One Thing! -Project Noah 19
Week 19: Buy 3 cans tuna and 3 cans pork and beans for 72 hour kit.
Hint: Put together a first aid kit for the car.
Wednesday, December 31, 2008
Happy New Year!
I've never been much for the whole New Year's resolution tradition, too much public risk and disappointment, which is weird because basically I am a pretty open book, but there you go. I guess it's kind of like breaking a promise to myself or something... don't wanna do that!
However. Things and circumstance always change and change is always good. So in light of the newfangled year and all it brings, here's a bit of a 'to do' list if you will:
Remove the furnishings, carpeting and all, from the "girls" room. Then do the same with the "studio" (heretofore the "boys" room).
Put down commercial grade Berber in both rooms, add new floor moldings.
In the new "guest room" add: a queen sized bed, the "family" dresser, and hang some photos. All this to make access to the bathroom easier and more convenient for guests, and to make a nice place for little people to play and nap closer to mom, dad, and or grandparents.
In the studio: Paint the closet doors chocolate brown. Configure the best way to align solid shelving along one wall, leave enough space for the gynormo (yet fabulous) business desk (soon to be an artist's desk!). Rehang the paper stack and glass shelves and generally make the room back in to a studio.
Put the food storage in the guest closet - finally.
Hang blinds in the front room.
Make a cornice box for the front room window.
Add bark cloth faux drapes to the inside of the cornice box.
Find and purchase a 5x7 rug for the front room.
Hang stuff (to be determined later) on the front room walls.
Rehang the wall arrangement in the hallway.
Repaint the master bedroom.
Repaint the two dressers and two side chests in the master bedroom and add grass cloth inserts, decide if I need/want a headboard of same after seeing the finished furniture.
Paint. Paint on canvas. One painting (at least) per month.
Clear out the "shed" and reorganize the boxes out there. Learn E-Bay and/or garage sale the items and begin to de-clutter on a huge scale.
Use up the crafting materials I have on hand.
Make specific items for sale in two major city open air markets, summer, fall, and winter. Meaning I will have a schedule for assembly line type of crafting to build up product.
Learn loom knitting, which seems pretty easy from what I can tell so far.
Take at least ten photos per day in an effort to become a better photographer.
With Thor, empty out the garage of clutter and sell off what we haven't used in years. Organize it so that more space can be used for the gym equipment we already have.
As far as personal goals are concerned, they will remain personal. However some old habits will be renewed and some forgotten. Continue to work on self reliance and emergency preparedness, adding to and rotating what we already have.
I'll let you know how well the other goals come along and hopefully post some photos as the projects progress.
So Happy New Year everyone! I hope all your goals and resolutions are fun and fulfilled!
Tuesday, December 30, 2008
Do One Thing! -Project Noah 18
Week 18: Obtain bag or duffel for 72 hour kit.
Hint: Each family or individual should have portable container(s) with emergency supplies such as the following: water, food requiring no refrigeration or cooking (graham crackers, canned fruits, canned meats), medications and critical medical histories required by family members, change of clothing, including 2 pairs of stockings; sanitary supplies; first aid booklet and equipment; candles; matches; ax; shovel; can opener; and blanket. The container should be placed where it can be picked up at a moment's notice.
Tuesday, December 23, 2008
Do One Thing! -Project Noah 17
Week 17: Hydrogen peroxide and alcohol. (no, not that kind...well, who am I to judge! Do what you got to do!)
Hint: Learn First Aide and "Treating Bleeding". If you have already learned these skills, review them or renew your CPR certification, take a new class at the Red Cross, or perhaps go to the local Community College and get even more education!
Tuesday, December 16, 2008
Do One Thing! -Project Noah 16
Week 16: Year supply of garden seeds rich in Vitamin A&C appropriate for area (no hybrid). Please rotate your seed! Most seeds are only viable for five years, so don't just store them - plant them!
Hint: Every yard/home has space for a garden. Part of the lawn, play area, or flower garden may be converted to a garden. Vegetables may be grown in window boxes or pots. Plant the garden where it will receive at least 4 - 6 hours of direct sunshine each day. The soil should drain well, and an adequate source of water should be available.
Bigger greener Hint: Avoid nasty GMO seed that may be "Round Up Ready"(meaning they have been genetically modified to produce one crop then die, and never reseed!) Please explore these sites for fabulous heirloom Non-GMO seeds that are full of flavour and nutrition as God intended it!
Bountiful Gardens (my favourite!)
Baker Creek
Heirloom Seeds
Heirloom Acres
Victory Seeds
Seed Savers
Vegetable Seeds (having a sale right now!)
Seed Fest U.K.
Magic Garden
Tuesday, December 09, 2008
Do One Thing! -Project Noah 15
Week 15: First aid cream and tape, cotton balls and ace bandage.
Hint: An important emergency precaution is to have tetanus immunizations up to date - at least every 10 years.
Tuesday, December 02, 2008
Do One Thing: Week 14
Week 14: Bandages.
Hint: Make sure you have emergency provisions for pets.
Standard First Aid Supplies: adhesive tape, ammonia, antibiotic ointment, bicarbonate of soda, calamine lotion, diarrhea remedy, elastic bandages, gauze bandages, hot water bottle, hydrogen peroxide, ipecac syrup (induces vomiting), knife, matches, measuring cup, medicine dropper, needles, paper bags, razor blades, rubbing alcohol, safety pins, scissors, soap, thermometer, triangular bandages, tweezers, first aid book, prescription medications, consecrated oil. First aid kits and supplies should be checked and replenished regularly. All supplies should be labeled and organized for fast use.
Monday, November 10, 2008
Do One Thing: Project Noah: Week 11
Week 11: Dish Soap.
Hint: Store extra prescription medication in an air tight container labeled "Emergency use only." Rotate it each time you renew your prescription.
Wednesday, November 05, 2008
Tuesday, November 04, 2008
Do One Thing: Project Noah: Week 10
Week 10: Coal, wood, briquettes, propane, matches, candles for cooking and light.
Hint: Make buddy burner. Cut strips of corrugated paper in 1 ½ in widths. Roll each strip tightly and fit in a tuna fish can. Pour melted paraffin wax in the can so that it soaks the paper and fills the remaining space. Each can will burn for 1 ½ to 2 hours!
Wednesday, October 22, 2008
weekend project


I got an e-mail from a friend of mine last week asking me if I could make a bouquet for a wedding taking place at her home this coming weekend. Luckily for me, the bride wanted silks. Thor and I will be gone three days before the wedding so fresh would have been a problem!
We went shopping Saturday afternoon and that night I went to work. I was surprised that the bouquet used all the stems we purchased, but it did! She requested all white flowers with a bit of green. There are two dozen roses, 16 large 8 buds, 5 stems of cascading blooms, and another five bunches of ivy.
I used the red and gold bud leaves as accent colour and to bring in a bit of the fall colours she plans, and also the deep green large leaves to poke out in the bouquet and also as a way of 'plating' the base and supporting the ivy bunches.
She wanted burgundy and metallic gold ribbon, and again, lucky for me I had a spool that was approved! She wanted a small "shoe lace" bow and braided stems, so I did that for her, although I forgot to get a shot of the braided stem.
They also requested a matching boutonniere so I used the same combination of flowers and greenery and there you go.
My friend liked them very much, I am hoping the bride does as well.
Check out Food Chronicles, I understand Robyn got a last minute call to prepare and decorate the cake. I can't wait to see what she does!
Tuesday, October 21, 2008
Do One Thing: Project Noah, week 8
Week 8: One bottle of vegetable oil or one can of shortening.
Hint: Double check emergency supplies for baby, are diapers and clothing going to fit? (We used to buy sweat shirts/pants one year's size ahead and then just switch it out on the 'anniversary'.) Formula? (even nursing moms should make sure there is formula available and enough water stored to mix it properly.) Also, if you have a special needs dietary condition in your family, store their special diet foods as well; or whatever your doctor advises as an emergency substitute. This is the time to ask and prepare!
Tuesday, October 07, 2008
Bleach Pen Skeleton Shirt Tutorial
So here you go folks, a tutorial on using a Clorox Bleach Pen to dye/bleach out a 100% cotton tee shirt. This one, a skeleton! The bleach works out to a variety of oranges, kind of creepy looking actually. Skill level really depends on your art skills. The more confident artist will just sit down and draw out a skeleton. The less experienced crafter may need to practice and/or take a bit of time. All in all it's just bones and a costume, so does it really matter if it's not perfect? Have fun!
Click here to view a (larger!) you tube version. You Tube got upset at me and I had to change the music. Then I changed the music and it pouted for a few days, guess they forgive me and it's up now. I changed the music to my daughter's concert band, how can they get mad about that? The music is cool, "The Pines of Rome, Appian Way" (where all the dead soldiers rise out of their graves and march into Rome...appropriate I thought. You can here their 'boom boom' march as the back beat, cool.) It was the performance done at Disney Hall (hall, not land- they were and still are the only youth symphony allowed to perform there.), so it's pretty good. Any who, larger version at the link!
Do One Thing: Project Noah, week 7
Week 7: 8 ounces of Salt.
--Or hey, why not grab the whole box? And some other spices, nothing says "boring dinner" like having only salt to work with. My choices would include: Black Pepper, Garlic Powder, Italian Seasonings, a really nice Poultry Blend, maybe some Mexican Blend, Onion, yup-definitely Onion Powder, some Bay Leaves, and Cinnamon!
Hint: Evaluate family preparedness, set goals for the coming year and seek to obtain them.
Tuesday, September 30, 2008
Do One Thing: Project Noah, week 6
Week 6: 1 large jar of honey. (The larger the better..nothing better than a peanut butter and honey sammich when you need a sweet lunch! Just remember this treat is only for those over two years old. No honey for little ones!) Did you know honey has a really long shelf life, and that if your honey crystallizes it doesn't mean it's gone bad, it can be brought back to it's thick smooth sweet goodness via warming! (I want some toast with honey now.)
Hint: Double check flashlight and battery supply.
Also, for those of you who live in California: We, the entire state, have been invited to participate in the world's largest earthquake drill...ever! On November 13 at 10:01 a.m. we will "experience" a 7.8 earthquake along the San Andreas fault. This is only a drill! hehe! But hey, why not participate and see if you're as prepared as you think you are? Go to ShakeOut.org to sign up as a participant. It's free, and it's full of information on the drill. If you want other information on how to prepare for the actual event, the resources page has other videos, a webinar, and other website links to help you find information. Scroll the entire page, the good stuff is near the bottom. I personally viewed the webinar, and wow! there's some interesting stuff there.
Tuesday, September 23, 2008
Getting Ready for Halloween Tutorial
I like a good Halloween. What's not to like about this pagan holiday? You get to dress goofy, beg for free candy, and scare people without fear of reprisal... well there is a risk of having your house t.p.'d but other than that, hey! Let's Party! Every year I try to deck the house out even though no one in our town really trick or treats anymore, unless they are looking for a way to satisfy their munchies, but still I love to do up the yard with luminaries, cool pumpkins and of course a silly graveyard.
O.k. I admit I pull this post out every other year, but hey, it's a good tutorial, quick, fun, EASY, and cheap! The main instructions are on the Flickr! page accessed via either clicking on the photo, or by clicking on the little Flickr! dookhickey on the right side near the bottom of the page. So without further ado... the DIY tombstone:
Flickr! page tute - click: Tombstones. Scroll down to the tombstone photos and follow the instruction beginning with "a" and finishing up with "g".
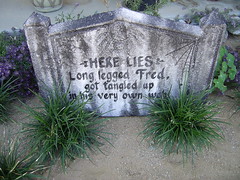
In the "spirit" of Halloween, I spent the afternoon in quiet solitude and carved up some fun! The undertaking? Tombstones!
This is the first of the new tombstones for this year. (2005) This one is 24" wide by 16" high and is made from 1" thick (I originally wrote 1 inch thick...but it's really 2 inches, oops.) foam board insulation that comes in a variety of sizes. (Lowes/Home Depot) I chose the 4'x8' sheets. About $12.00 out the door and into the minivan.
If you are like S'mee, you will need to have the guys on the floor cut it into 2 pieces for you (so it can fit in your vehicle). As you can see in the photo, there are indeed "lines" that one could follow -if they wished to do so- the guys I was working with at the time were less than cooperative and decided to "freehand" it on the totally white side without marks and guidelines. UGH! and GRRR!
Make sure you stress the first cut along the lines, otherwise, like S'mee, you will lose one inch, or more, when they cut it diagonally. again UGH!
O.k. so click on that Flickr! link and get started, seriously, if you work in assembly line fashion, this only takes a few hours and you can whip out an entire graveyard!
Project Noah: Week 5
Thor and I packed all these plus sweat pants/shirt for layering. Comfort items: Scriptures, books, small travel type games, cards and dominoes, favorite toys, paper, pens/pencils/ crayons, music, etc. (um, I packed M&Ms and tootsie pops!)
Subscribe to:
Posts (Atom)